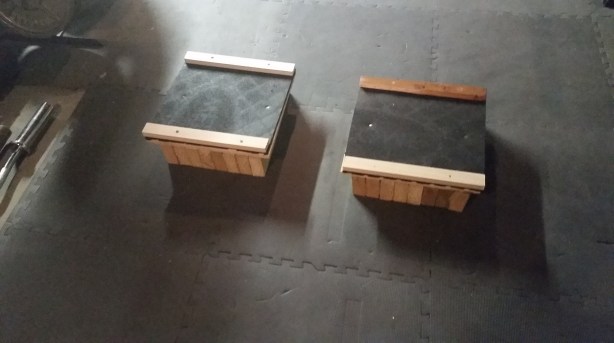
I have become a HUGE fan of the Do-It-Yourself stuff lately. I have taken it upon myself to try to upgrade and outfit the Heavy Hammer Gym with as many DIY projects that I can. My latest endeavor resulted in a pretty nice product. I made Deadlift Blocks. Here is what you need to know:
- Here is a great article from EliteFTS explaining some benefits of partial range of motion deadlifting: Partial Movement Training For The Deadlift / Elite FTS
- You can make this a DIY project, but if you don’t think you are up to it there are a lot of choices out there for purchasing deadlift blocks such as: Rogue 15 Wood Jerk Block Pair, Rogue Medium Metal Pulling Blocks, or DC Blocks – Set of 18.
- List of materials used. (you can make them to whatever dimensions you think will work for you and your space/needs; this list will make 2 blocks(because you need 2 blocks to do it right))
- 8 – 4×4 cut to 15″ lengths (I actually used 2×4’s because I couldn’t cut the thicker wood)
- 2 – 3/4″ plywood cut to 15″ squares
- 2 – 1/2″ rubber matting cut to 15″ squares ( I used a very nice welcome mat for mine, just flipped it upside down; people tend to use horse stall mats)
- 4 – 1×2 cut to 15″ length (so weights don’t roll off the top of the block)
- 2 1/2 ” or 3″ screws
- EXTRA: Wood Glue (I actually used industrial strength so it will hold up longer)
Pretty easy to put together. Used 4-4×4’s on the bottom, screw them together (use wood glue too, maybe, I did), screw (wood glue) plywood to top of 4×4’s, screw (wood glue) rubber mat to top of plywood, screw (wood glue) 2- 1×2’s to top of mat on either side. Be generous with screws (wood glue) to make sure it can handle the HUGE weights you will be using on it.

Hope you like this DIY project as much as I have. I have used them multiple times now with 400+ lbs and they haven’t moved/given out at all. Check back from time to time for more DIY Gym Projects.

DC Blocks HQ
LikeLike